
 Introduction
Stains & finishes
Parts List
 Page 1 Page 1
 Page 2 Page 2
Assembly
 Page 1 Page 1 
 Page 2 Page 2
 Page 3 Page 3
 Page 4 Page 4
Trouble Shooting


|
|

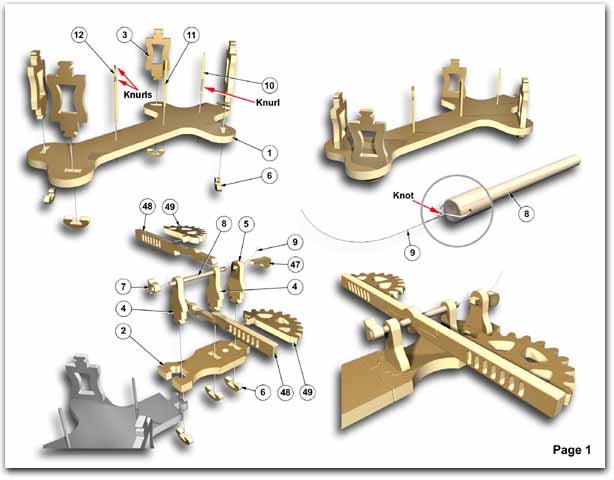
PAGE 1. BACK BOARD
- Insert the main brass shafts #10, 11 & 12 into the back board #1.
- Make sure the knurls (ridges) are in the correct locations.
- Assemble (4) uprights #3 on back board #1. Do not use force.
- Lock with keys #6.
PAGE 1. ESCAPEMENT SWING ARM
- Assemble back board top #2 onto back board #1.
- Press the escapement pawl #7 on swing shaft #8.
- Push (2) swing arm uprights #4 into back board top #2 and lock with keys #6.
- Insert swing shaft #8 into swing arm uprights #4.
- Swing shaft #8 must spin freely in supports #4. Rub candle wax onto bearing areas
for smooth rotation.
- Thread string #9 through hole in swing shaft #8 and tie a knot.
- Slide the (2) locking swing arms #48 together around swing shaft #8.
- The flat on the escapement pawl #7 must face to the left and be at right angles to the
swing arms #48.
- Insert wedge upright #5 into back board top #2 and lock with key #6.
- Thread string #9 through square hole in wedge upright #5 (Pull for now, adjust later),
and insert wedge #47.
- The string should be positioned in the middle of the square hole.
- Assemble (2) swing arm weights #49 on swing arms #48.
|


